Battery switch on travel trailer function is crucial for managing your RV’s power. Understanding how your battery switch works is key to avoiding frustrating power outages and ensuring a smooth camping experience. This guide covers everything from the different types of switches available to troubleshooting common problems and performing essential maintenance. We’ll break down the complexities in an easy-to-understand way, helping you become confident in managing your travel trailer’s electrical system.
Whether you’re a seasoned RVer or a first-timer, mastering your battery switch is essential for reliable power on the road. This guide provides a comprehensive overview of its operation, maintenance, and troubleshooting, empowering you to confidently handle any electrical challenges that may arise.
Battery Switch Types in Travel Trailers
Choosing the right battery switch for your travel trailer is crucial for managing your power sources efficiently and safely. Different types offer varying levels of control and complexity, each with its own set of pros and cons. Understanding these differences will help you select the best option for your needs.
Single Battery Switch
A single battery switch is the simplest type. It’s essentially an on/off switch controlling the connection between your trailer’s battery and the electrical system. This is ideal for trailers with only one battery.
| Component | Function | Diagram |
|---|---|---|
| Switch | Connects or disconnects the battery from the trailer’s electrical system. | A simple on/off switch symbol. |
| Battery | Provides power to the trailer’s electrical system. | A standard battery symbol (+ and – terminals). |
| Trailer Electrical System | Lights, appliances, etc., that draw power from the battery. | A simplified circuit symbol representing the trailer’s wiring. |
Advantages: Simple, inexpensive, easy to install and maintain.Disadvantages: Only suitable for single-battery setups; offers no isolation or switching between multiple batteries.
Dual Battery Switch
A dual battery switch allows you to control two batteries independently. This is common in trailers with a house battery (for appliances) and a starting battery (for the engine). You can typically switch each battery on or off individually, or sometimes both simultaneously.
| Component | Function | Diagram |
|---|---|---|
| Switch 1 | Controls the connection of Battery 1 (e.g., house battery) to the trailer’s electrical system. | A switch symbol with “Battery 1” labeled. |
| Switch 2 | Controls the connection of Battery 2 (e.g., starting battery) to the trailer’s electrical system. | A switch symbol with “Battery 2” labeled. |
| Battery 1 | Provides power to the trailer’s house system. | A standard battery symbol (+ and – terminals). |
| Battery 2 | Provides power to the trailer’s starting system. | A standard battery symbol (+ and – terminals). |
| Trailer Electrical System | Lights, appliances, etc. | A simplified circuit symbol representing the trailer’s wiring. |
Advantages: Allows independent control of two batteries, preventing one dead battery from affecting the other; Offers better power management.Disadvantages: More complex than a single switch; slightly more expensive.
Battery Selector Switch
A battery selector switch offers more sophisticated control over multiple batteries. It allows you to select which battery (or combination of batteries) powers the trailer’s system. Some even allow for combining both batteries to provide more power.
| Component | Function | Diagram |
|---|---|---|
| Selector Switch | Allows selection of different battery configurations (e.g., Battery 1 only, Battery 2 only, Both Batteries, Off). | A rotary switch symbol with positions labeled for each battery configuration. |
| Battery 1 | (e.g., House Battery) | A standard battery symbol (+ and – terminals). |
| Battery 2 | (e.g., Starting Battery) | A standard battery symbol (+ and – terminals). |
| Trailer Electrical System | Lights, appliances, etc. | A simplified circuit symbol representing the trailer’s wiring. |
Advantages: Provides maximum control and flexibility over multiple batteries; allows for combining batteries for increased power.Disadvantages: Most complex and expensive option; requires more understanding to operate correctly.
So, you’re planning a trip? Awesome! First things first: get travel insurance. Check out Aon travel insurance for solid coverage. Then, if you’re hitting the road in a travel trailer, knowing how the battery switch on travel trailer function works is crucial. It’ll save you headaches (and potentially a dead battery!) down the line.
Make sure you understand both before you go; it’s all part of smart travel prep!
Proper Battery Switch Operation
Operating your travel trailer’s battery switch correctly is crucial for maintaining your batteries’ health and ensuring you have power when you need it. Incorrect operation can lead to premature battery failure, electrical problems, or even damage to your trailer’s electrical system. This section details the safe and efficient operation of your battery switch.
Understanding your battery switch is the first step to safe and effective use. Most switches have clearly labeled positions, often accompanied by indicator lights. Always refer to your trailer’s owner’s manual for specific instructions related to your model’s battery switch.
Safe Switching Procedures
The following steps Artikel the proper procedure for switching between batteries or connecting/disconnecting shore power. Remember, safety is paramount. Always disconnect from shore power before working directly with the battery system.
- Turn off all appliances and electronics: This prevents unexpected surges or shorts when switching the battery system.
- Disconnect shore power: Unplug your RV from the power source before making any changes to the battery system. This prevents backfeeding and potential damage.
- Identify switch positions: Familiarize yourself with the positions on your battery switch (e.g., “Off,” “Battery 1,” “Battery 2,” “Both,” “Shore Power”). Your owner’s manual should clearly illustrate this.
- Switch to the desired position: Carefully move the switch to the desired position. Listen for any unusual clicks or sounds; if you hear something unusual, stop and check your connections.
- Reconnect shore power (if applicable): Once the battery switch is in the correct position, you can reconnect to shore power if needed.
- Verify power: After switching, check your appliances and electronics to ensure they are functioning correctly. If there’s a problem, immediately switch the battery switch back to the “Off” position and investigate the issue.
Battery Switch Indicator Lights
Many battery switches include indicator lights to show the current status of the system. These lights typically use a combination of colors (often green and red) and positions to convey information.
For example, a green light might indicate that the battery is properly connected and charging, while a red light might signal a problem such as low voltage or an overcharge condition. Always refer to your specific switch’s instruction manual for the meaning of its indicator lights. The lights are there to help you diagnose potential problems before they become serious issues.
Common Mistakes and Avoidance
Several common mistakes can occur when operating a battery switch. Understanding these and taking preventative measures will help ensure the longevity and proper function of your RV’s electrical system.
- Switching while appliances are running: This can cause voltage spikes and damage to electronics. Always turn off appliances before switching.
- Ignoring indicator lights: Pay attention to warning lights. A malfunctioning light or an unusual light pattern can indicate a serious problem. Ignoring these warnings can lead to battery damage or even fire.
- Forcing the switch: If the switch is difficult to move, don’t force it. There might be a problem with the wiring or the switch itself. Investigate the issue before proceeding.
- Improper connection of shore power: Always ensure that the shore power is properly connected and grounded before turning on any appliances. Incorrect grounding can lead to electrical shock.
Troubleshooting Battery Switch Issues
Dealing with a malfunctioning battery switch in your travel trailer can be frustrating, but with a systematic approach, you can often identify and fix the problem. Understanding the common causes of these issues and employing a safe troubleshooting procedure will get you back on the road quickly. Remember, safety is paramount when working with electrical systems.
Common problems with travel trailer battery switches range from simple issues like blown fuses and corroded terminals to more complex problems involving wiring faults or the switch itself. These problems often manifest as a complete lack of power to the trailer’s 12V system, intermittent power loss, or even the inability to switch between battery banks.
Common Battery Switch Problems and Their Causes
Let’s look at some of the most frequent culprits behind battery switch malfunctions. Identifying these issues is the first step towards a successful repair.
- No Power: This could indicate a blown fuse in the battery switch circuit, a faulty switch, a disconnected wire, or a problem with the batteries themselves. A thorough visual inspection is the first step.
- Blown Fuses: Overloaded circuits or short circuits are the usual suspects. Check the fuse ratings and replace blown fuses with fuses of the same rating. Don’t use a higher amperage fuse as a replacement; this is a fire hazard.
- Corroded Terminals: Corrosion restricts current flow and can lead to poor connections, voltage drops, and ultimately, system failure. Cleaning the terminals with a wire brush and applying a corrosion inhibitor is a simple fix.
- Faulty Battery Switch: The switch itself might be defective. This often requires replacing the entire switch, which might involve some basic wiring knowledge.
- Loose or Damaged Wiring: Vibration during travel can loosen connections or even damage wires. Check all connections for tightness and any signs of damage. Repair or replace damaged wires as needed.
Systematic Troubleshooting Procedure
A structured approach is key to efficiently diagnosing battery switch problems. This flow chart guides you through a logical process of elimination.
| Step | Action | Possible Outcome | Next Step |
|---|---|---|---|
| 1 | Check all fuses associated with the battery switch. | Blown fuse(s) found. | Replace fuse(s) with the correct amperage. Retest the system. |
| No blown fuses. | Proceed to Step 2. | ||
| 2 | Inspect battery terminals for corrosion. | Corrosion present. | Clean terminals and apply corrosion inhibitor. Retest the system. |
| No corrosion. | Proceed to Step 3. | ||
| 3 | Visually inspect all wiring connected to the battery switch. | Loose or damaged wires found. | Tighten loose connections or repair/replace damaged wires. Retest the system. |
| No loose or damaged wires. | Proceed to Step 4. | ||
| 4 | Test the battery switch itself using a multimeter (if you have one). | Switch is faulty. | Replace the battery switch. |
| Switch is functioning correctly. | Check batteries and charging system. |
Safety Precautions
Working with electrical systems requires caution. Ignoring these precautions could lead to injury or damage to your equipment.
- Disconnect the negative battery terminal: Always disconnect the negative (-) terminal first before performing any work on the electrical system. This prevents accidental short circuits.
- Use insulated tools: Employ insulated screwdrivers and other tools to avoid accidental shocks.
- Wear safety glasses: Protect your eyes from sparks or flying debris.
- Work in a well-ventilated area: Battery fumes can be hazardous. Ensure proper ventilation.
- Consult a professional: If you’re uncomfortable working with electrical systems, don’t hesitate to call a qualified RV technician.
Battery Switch Maintenance and Upkeep
Keeping your travel trailer’s battery switch in good working order is crucial for reliable power and preventing costly repairs. Regular maintenance ensures your batteries stay charged and your electrical system functions correctly. Neglecting maintenance can lead to corrosion, poor connections, and ultimately, switch failure. This section Artikels a simple maintenance schedule and helpful tips to maximize the lifespan of your battery switch.Regular maintenance of your travel trailer’s battery switch is essential for ensuring a long and trouble-free life.
A simple routine, performed periodically, can prevent many common problems.
Regular Maintenance Schedule
A regular maintenance schedule should include cleaning, inspection, and tightening connections. This should be done at least twice a year, or more frequently if you live in a particularly humid or corrosive environment.
- Cleaning: Use a wire brush or battery terminal cleaner to remove any corrosion or dirt from the battery terminals and switch contacts. Pay close attention to the connection points, ensuring all surfaces are clean and free of debris. A solution of baking soda and water can also be effective for neutralizing acid buildup.
- Inspection: Visually inspect the switch for any signs of damage, such as cracks, loose wires, or overheating. Check the tightness of all connections, ensuring they are secure. Look for any unusual wear and tear on the switch itself. A slightly loose switch can cause arcing and lead to premature failure.
- Tightening Connections: Use a wrench to tighten all connections, including those on the battery terminals and the switch itself. Ensure that all connections are snug and secure, but avoid over-tightening, which can damage the terminals.
Preventing Corrosion on Battery Terminals and Connections
Corrosion is a common problem that can significantly impact the performance of your battery switch. Taking preventative measures can help extend the life of your battery system.Preventing corrosion is key to maintaining a reliable battery connection. The build-up of corrosion on battery terminals creates resistance, hindering the flow of electricity and potentially leading to battery damage or system failure.
Regular cleaning is crucial, but proactive measures can further minimize corrosion.
- Apply a Protective Coating: After cleaning the terminals, apply a thin layer of dielectric grease or anti-corrosion spray to prevent future corrosion. This creates a barrier between the metal and the environment, inhibiting oxidation.
- Use Battery Terminal Protectors: Consider using battery terminal protectors, which are small covers that fit over the terminals to keep them clean and dry.
- Maintain a Clean Environment: Keep the battery area clean and dry. Avoid spilling water or other liquids near the battery and terminals.
Extending the Lifespan of a Battery Switch
Several practices can significantly extend the life of your travel trailer’s battery switch. These involve careful operation and proactive maintenance.Proper usage and preventative maintenance are crucial for maximizing the lifespan of your battery switch. Understanding the switch’s capabilities and limitations, combined with regular care, ensures consistent performance and prevents premature wear.
- Avoid Overloading: Don’t draw more power from your battery system than it can safely handle. Overloading can cause excessive heat and damage the switch.
- Use the Switch Correctly: Always turn the switch completely on or off; avoid leaving it in an intermediate position. This prevents arcing and overheating.
- Regular Inspection and Maintenance: As previously discussed, regular inspection and maintenance are essential to catching problems early and preventing major issues.
Battery Switch Integration with Other Systems: Battery Switch On Travel Trailer Function
Your travel trailer’s battery switch isn’t a standalone component; it’s the central hub for managing power flow between your batteries and other electrical systems. Understanding how it interacts with these systems is crucial for efficient power management and preventing damage. This section details the interplay between your battery switch and key electrical components, offering a simplified schematic for clarity.
The battery switch acts as a gatekeeper, controlling the flow of DC power from your batteries to various systems. When the switch is “on,” power flows to the connected components; when “off,” it isolates the batteries, preventing drain. This interaction is critical for safety and efficient energy use. Proper understanding of this integration is essential for safe and reliable operation of your travel trailer’s electrical system.
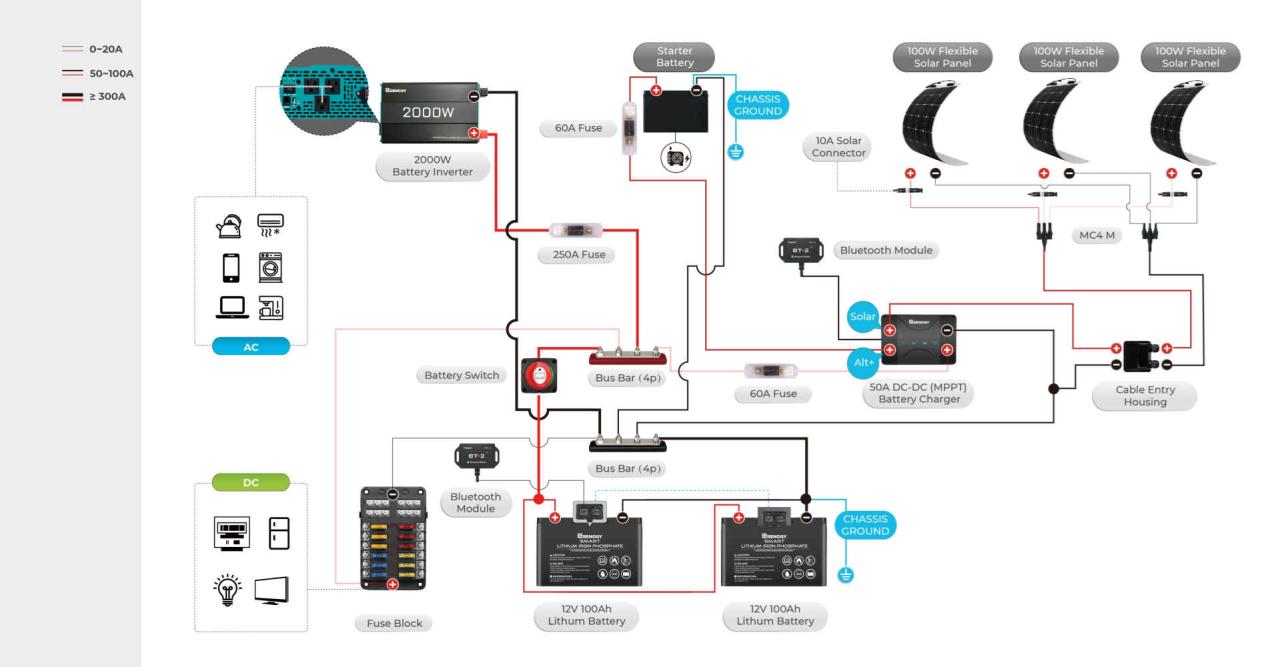
Electrical Connections and a Simplified Schematic
Below is a simplified schematic showing how the battery switch interacts with a typical travel trailer’s electrical system. Note that configurations can vary based on your specific setup. This schematic illustrates a common arrangement to give you a good understanding of the system’s interconnectedness.
| Component | Description | Connection to Battery Switch | Notes |
|---|---|---|---|
| Battery Switch | Main power control | Direct connection to battery bank(s) | Typically a 2 or 3 position switch (off, battery, battery & shore power) |
| Battery Bank | 12V DC power source | Direct connection to battery switch | Lead-acid or Lithium-ion batteries |
| Converter | Converts 12V DC to 120V AC | Connected to the “battery” or “battery & shore power” position of the switch | Powers AC outlets when not on shore power |
| Inverter | Converts 12V DC to 120V AC | Connected to the “battery” or “battery & shore power” position of the switch | Powers AC outlets, usually smaller capacity than the converter |
| Solar Panels | Generate 12V DC power | Usually connected directly to a charge controller, which then connects to the battery bank | Charges the batteries when sunlight is available |
| 12V DC Appliances | Lights, fans, water pump etc. | Connected to the “battery” or “battery & shore power” position of the switch | Directly draw power from the battery bank |
| Shore Power | External 120V AC power source | Connects to the converter and may charge the batteries through a built-in charger | Typically used when connected to a campsite power hookup |
Impact of Different Battery Types
The type of battery you use (lead-acid or lithium) can influence how you operate your battery switch, although the basic principle remains the same: controlling the power flow from the battery bank. However, there are important differences in charging requirements and characteristics that should be considered.
Lead-acid batteries require careful charging management to avoid overcharging or sulfation. Lithium batteries, while generally more efficient, have different voltage and charging profiles. A poorly configured system can damage lithium batteries. Therefore, it is essential to ensure your battery switch and charging system are compatible with the type of battery you’re using. For instance, some lithium battery systems incorporate their own sophisticated charging and management systems that may require specific connections, bypassing some functions of the standard battery switch.
So, you’re planning a big trip? Awesome! First things first: get yourself sorted with travel insurance. Check out Aon travel insurance for comprehensive coverage. Then, if you’re hitting the road in an RV, knowing how the battery switch on travel trailer function works is super important – it’ll save you headaches down the line.
Seriously, understanding your RV’s electrical system is key for a smooth trip. Happy travels!
Battery Switch Upgrades and Replacements
Upgrading or replacing your travel trailer’s battery switch can significantly improve your RV’s electrical system performance and reliability. This section will cover various aspects of this process, from choosing a replacement to performing the installation. We’ll also explore the benefits of moving to more advanced systems.
Comparing Battery Switch Brands and Models
Choosing the right battery switch depends on your needs and budget. Several reputable brands offer a range of switches for travel trailers, each with varying features and price points. The following table provides a comparison of some popular options. Note that prices and availability can change, so it’s always best to check with your local RV supplier or online retailers for the most up-to-date information.
Customer reviews are based on averages from various online platforms and may vary.
| Brand | Model | Features | Price Range (USD) | Customer Review Summary |
|---|---|---|---|---|
| Blue Sea Systems | Various models (e.g., 7610, 7625) | High-quality construction, multiple battery configurations, clear labeling | $50 – $150 | Generally positive; praised for reliability and ease of use. |
| Perko | Various models (e.g., 0094DP2CHR) | Durable, often includes indicator lights, various amperage ratings | $40 – $120 | Mixed reviews; some report issues with longevity, others praise their robustness. |
| Xantrex | Various models (e.g., LinkPro) | Advanced features, often includes remote control capabilities, sophisticated monitoring | $150 – $500+ | Positive reviews; noted for advanced functionality and integration with other systems, but higher cost. |
| Generic/Aftermarket | Various | Simpler designs, lower cost, often less robust | $20 – $80 | Highly variable; some are reliable, others are prone to failure. |
Replacing a Faulty Battery Switch
Replacing a battery switch requires careful attention to safety. Improperly disconnecting batteries can lead to sparks and potential injury. Always disconnect the negative terminal first.
- Disconnect the Batteries: Begin by disconnecting the negative (-) terminal of both your house and starting batteries. Use a wrench appropriate for the battery terminal size. Then, disconnect the positive (+) terminals.
- Remove the Old Switch: Carefully remove the wires connected to the old battery switch. Take pictures or make notes to remember the wiring configuration before disconnecting anything. Once the wires are disconnected, remove the switch from its mounting location using the appropriate tools (screwdriver, etc.).
- Install the New Switch: Mount the new switch in the same location as the old one. Secure it tightly using the provided hardware.
- Reconnect the Wires: Carefully reconnect the wires to the new switch, ensuring that they are connected to the correct terminals. Refer to your wiring diagram or pictures taken earlier. Double-check all connections.
- Reconnect the Batteries: Connect the positive (+) terminals first, followed by the negative (-) terminals.
- Test the Switch: Turn the switch on and off to ensure it is functioning correctly. Check all battery voltages to confirm proper operation.
Upgrading to a More Advanced Battery Switch System
Upgrading to a more advanced system, such as one with remote switching capabilities, offers several advantages. Remote switching allows you to control your battery banks from inside your RV, eliminating the need to go outside to switch batteries. Some advanced systems also incorporate monitoring features, providing real-time data on battery voltage and state of charge. Consider the added cost and complexity when choosing this option, however.
A remote switch system may require additional wiring and potentially professional installation.
Visual Representation of Battery Switch Components
Understanding the physical makeup of a travel trailer battery switch is crucial for safe and effective operation. This section provides a detailed description, allowing you to visualize and comprehend the switch’s internal workings and external connections. We’ll cover the casing, terminals, and internal circuitry, explaining their functions and interrelationships.A typical battery switch for a travel trailer is a relatively robust device designed to withstand vibration and environmental exposure.
Switch Casing and External Features
The switch casing is usually constructed from durable, weather-resistant plastic or metal. This protective shell shields the internal components from moisture, dust, and physical damage. The casing typically features a clearly marked on/off position, often with labels indicating which battery banks are connected (e.g., “Both,” “House,” “Start”). Several mounting holes are also present, allowing for secure installation in the trailer.
External dimensions vary depending on the switch’s capacity and amperage rating. A larger switch will generally have a more substantial casing to accommodate larger terminals and internal components.
Terminals and Cable Connections
The battery switch will have multiple terminals, typically heavy-gauge studs or bolted connections. These terminals are designed to accept large-gauge battery cables, which carry significant current. A typical switch might have three or more terminals: one for the positive (+) battery cable from the vehicle’s starting battery, one for the positive (+) cable from the house battery bank, and a common output terminal for the positive (+) side of the load.
Negative (-) terminals are usually connected directly to the chassis and battery banks, often bypassing the switch for safety and to reduce the number of high-current connections on the switch. The positive terminals are clearly marked, often with large “+,” labels or color-coding. Incorrect connections can lead to short circuits, damaged equipment, and potentially dangerous situations. For example, connecting the house battery’s positive cable to the vehicle’s starting battery’s negative terminal would create a direct short, potentially causing sparks, melting wires, and battery damage.
Internal Circuitry, Battery switch on travel trailer function
Internally, the switch employs a simple but effective mechanism. The most common type is a rotary switch using a robust contact mechanism that establishes or breaks the electrical connection between the battery banks and the load. This mechanism is typically composed of heavy-duty contacts, which are designed to handle high current loads without overheating or arcing. A mechanical linkage connects the rotary handle to the contact mechanism.
The internal design minimizes contact resistance, ensuring efficient current flow when the switch is in the “on” position. The switch’s internal components are embedded in a non-conductive material, providing electrical insulation and protection.
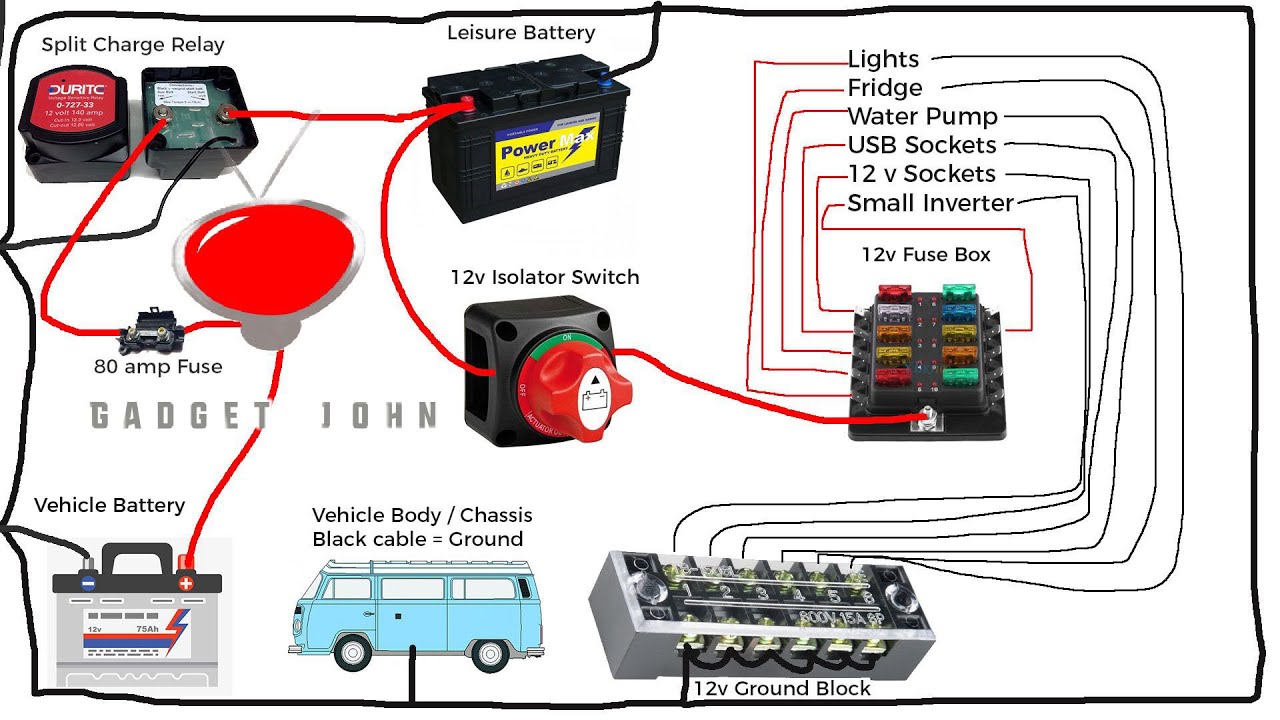
Cable Connection Diagrams and Implications of Incorrect Connections
The following diagrams illustrate correct and incorrect connections. Note that the negative (-) cables are often directly connected, bypassing the switch.Correct Connection Diagram (Illustrative):Imagine a diagram showing three terminals on the switch: one labeled “+Start” connected to the starting battery, one labeled “+House” connected to the house battery bank, and a third labeled “+Load” connected to the positive side of the trailer’s electrical system.
The negative terminals of both batteries and the load are directly connected to the chassis. The switch controls the flow of current from the “+Start” and “+House” terminals to the “+Load” terminal.Incorrect Connection Diagram (Illustrative):Imagine a diagram showing the same terminals, but with the “+Start” and “+House” cables incorrectly connected, perhaps swapped or shorted. This diagram would clearly show the dangerous direct short circuit that would result.Incorrect connections, as illustrated, can cause significant damage, including blown fuses, melted wires, damaged electrical components, and even fire.
Always double-check your connections before turning on the switch.
Mastering your travel trailer’s battery switch is a simple yet powerful step towards ensuring worry-free adventures. By understanding the different types of switches, their operation, and common troubleshooting techniques, you’ll be well-equipped to handle any power-related issues that arise. Regular maintenance and preventative measures will further extend the lifespan of your switch and ensure reliable power for years to come.
So, get to know your battery switch, and enjoy the freedom of the open road!
User Queries
What happens if I accidentally leave my battery switch in the “off” position?
Leaving the switch off will disconnect your house batteries from the rest of the electrical system. You’ll lose power to your lights, appliances, and other 12V devices. Your 12V fridge will likely lose its cooling capacity.
How often should I clean my battery switch terminals?
Ideally, clean your battery switch terminals at least twice a year, or more often if you notice corrosion. This helps prevent poor connections and potential electrical issues.
Can I use different types of batteries with the same switch?
While many switches work with various battery types (lead-acid, lithium), it’s crucial to check the switch’s specifications and ensure compatibility. Using incompatible batteries may damage the switch or even create safety hazards.
My battery switch indicator lights aren’t working. What should I do?
Non-functioning indicator lights might indicate a problem with the switch itself or a wiring issue. Check fuses and wiring connections first. If the problem persists, consult a qualified RV technician.
